
Airless Paint Sprayers Tails – Their Causes and Solutions
What is an Airless Paint Sprayer Tail?
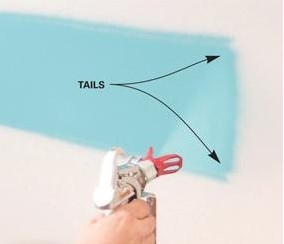
An airless paint sprayer tail is when the edges of your airless paint sprayers pattern do not remain uniform compared to the rest of your airless paint sprayers fan. The end result is lines at the edges of your spray pattern. Visually Airlesss Tails can be seen in the photo below. You can also view an additional picture of tails here.

What Causes Airless Paint Sprayer Tails?
Airless Paint Sprayer tails occur because the paint is not being evenly atomized by the fluid being forced through your airless paint sprayers fluid tip. There are a few different solutions to the problem of airless paint sprayer tails.
Potential Fixes for Airless Paint Sprayer Tails
- Increase the pressure on your airless paint sprayer – The most common cause of tails on an airless paint sprayer’s pattern is that the pressure is not turned up high enough to provide adequate even atomization of your coating throughout the pattern. The first thing to try is always to increase the pressure on your airless paint sprayer.
- Thin Your Paint – If increasing the pressure on the airless paint sprayer doesn’t work, you can try to add a little bit of an appropriate thinner to your paint. By using thinner paint less pressure will result in a greater break up of the coating which should help to reduce issues with tails.
- Clean your airless paint spray tip-if you have not recently cleaned the airless tip or the airless sprayer has been in storage for a while, you want to use an appropriate thinner to clean off the tip. If thinner does not remove any buildup on the tip, you may need to replace the tip. This is because any obstruction on your airless paint sprayers tip will result in issues in your spray pattern.
- Check the distance at which you are spraying from the surface product– For airless Paint sprayers the recommended distance is usually 12 – 14 inches. If you spray to close you can get fingers, if you move to slow you can get issues with puddling and fingers as well.
- Give the tip time to break in – A tip can sometimes need a bit of time to break in and spray appropriately if you have tried a variety of the other suggestions spraying on a surface that requires a less fine finish may be a good idea to see if the tip needs to be used a while.
- Consider a Fine Finish Airless Tip – A Fine finish airless tip brings the material through two restrictions causing an additional level of atomization. The downside to a fine finish tip is that they may not last as long as a traditional airless paint sprayer tip.
- Consider Air Assist Airless – If you routinely need finer atomization for your application, maybe because it is for wood finishing or an application that requires higher quality finishes, you may want to consider an air assist airless as the assist air will remove the fingers in your spray pattern.
- Use high quality paints – Often times higher quality paints will have less chance of plugging your airless tip which will help reduce problems with tails.
- Check your airless paint sprayers Stroke – An airless paint sprayer should have a crisp even stroke if it is not consistent throughout its stroke, your packings or balls and seats may be worn causing issues with consistent pressure. Without consistent pressure you could experience tails.
Conclusion
By considering these 8 tips you should be able to resolve the issue with your airless paint sprayer giving you tails. By eliminating tails you can achieve better finishes.